
Course 2D_WPF: 2D-Computer Graphics with C# + WPF
Chapter C2: The Draw Project
Copyright © by V. Miszalok, last update: 2011-01-31
Let me know
what you think
| Home | Course Index | << Prev | C2 Complete Code | PDF Version of this Page |
|
Course 2D_WPF: 2D-Computer Graphics with C# + WPF
|
|
Let me know what you think |
Guidance for Visual Studio 2010:
1) Main Menu after start of VS 2010: Tools → Options →
2) Main Menu after start of VS 2010: File →
Name: draw1 → Location: C:\temp →
| 3) In the window titled: Solution Explorer -Solution 'draw1' (1 project) we have to add 4 References and an draw1.cs file: 3.1 Right-click the branch References. A drop-down menu appears. 3.2 Right-click the branch draw1. A drop-down menu appears. |
The Solution Explorer should show this: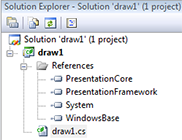 |
4) Main menu of Visual Studio 2010 → Project →
5) Main menu of Visual Studio 2010 → Tools →
Click General. Uncheck all three check boxes.
Click Indentation. Uncheck all four check boxes.
Click New Lines. Uncheck all thirteen check boxes.
Click Spacing. Uncheck all twenty three check boxes.
Click IntelliSense. Uncheck all six check boxes.
6) Write the following three lines into the empty draw1.cs:
public class window1 : System.Windows.Window
{ [System.STAThread] static void Main() { new System.Windows.Application().Run( new window1() ); }
}
7) Click Debug in the main menu of VS 2010.
A submenu opens. Click Start Debugging F5.
The rudimentary program now automatically compiles, links and starts. Please observe the Error List-window of Visual Studio below our program.
Our program starts automatically as stand-alone window containing three parts:
- main window = MainFrame with a blue title row
- three buttons Minimize, Maximize, Close
- a narrow frame with 4 movable borders and 4 movable corners. Enlarge and shrink the window by dragging its borders and/or corners.
Minimize VisualStudio to realize that draw1.exe is a stand-alone windows program.
Start the Explorer. Branch to C:\temp\draw1\bin\Release.
Double click draw1.exe. You can start an arbitrary number of instances of draw1.exe. (You must carefully kill all before You write new versions.) Minimize the Explorer.
Make sure that all instances of draw1.exe have been finished.
Important: Always finish all instances of draw1 before writing new code and starting it !
Start the Task Manager with Ctrl+Alt+Del and check if an draw1.exe-process is still running. If yes, kill it.
Delete everything from draw1.cs (including the last brace). No code remains.
Write the following lines into the empty draw1.cs:
using System;
using System.Windows;
using System.Windows.Media;
using System.Windows.Controls;
using System.Windows.Shapes;
using System.Windows.Input;


public class window1 : Window
{ [STAThread] static void Main() { new Application().Run( new window1() ); }
  Canvas    canvas  = new Canvas();
  TextBox   textBox = new TextBox();
  Polyline  p       = new Polyline();
  Point     p0      = new Point();
  Point     p1      = new Point();
  bool      pressed = false;
  public window1() //constructor
  { this.Width = this.Height = 500;
    this.Title = "draw1";
    Content = canvas;
    canvas.Children.Add( p );
    canvas.Children.Add( textBox );
    p.Stroke = Brushes.Black;
    p.StrokeThickness = 2;
    p.Points = new PointCollection();
    textBox.Text = "Press the left mouse button and move!";
  }
  protected override void OnMouseDown( MouseButtonEventArgs args )
  { p.Points.Clear();                //erase everything
    p0 = args.GetPosition( canvas ); //get   mouse position
    p.Points.Add( p0 );              //store mouse position
    pressed = true;
  }
  protected override void OnMouseMove( MouseEventArgs args )
  { if ( !pressed ) return;
    p1 = args.GetPosition( canvas ); //get   mouse position
    p.Points.Add( p1 );              //store mouse position
    p0 = p1;                         //old end is new start
  }
  protected override void OnMouseUp( MouseButtonEventArgs args )
  { p.Points.Add ( p.Points[0] );   //close polygon
    pressed = false;
  }
}
Click the Debug-tab of the main menu above the main window.
A sub-menu opens. Click Start Debugging F5.
The program automatically compiles, links and starts again.
Exercises:
1) Try out other colors in p.Stroke = Brushes.Black;.
2) Try out another line thickness in p.StrokeThickness = 2;.
3) Try out another string in textbox.Text = "Press the left mouse button and move!";.
4) Try out another initial window size in this.Width = this.Height = 500;.
5) Set comment slashes // in front of p.Points.Add ( p.Points[0] ); //close polygon.
6) Resize the window by dragging one of its borders or corners.
Important Tip: In case of mistype the compiler presents a Message Box: There were build errors. .... You quit with No. An Error List-window with warnings and errors will appear in Visual Studio below Your program. In this error list scroll up to the first error (ignore the warnings !). Double click the line with the first error. The cursor jumps automatically into Your code into the line where the error was detected. Look for mistypes in this line and remove them. (Sometimes You will not find the error in this line but above, where You forgot a comma or a semicolon.) Ignore all errors below the first error (in most cases they are just followers of the first one) and compile. Repeat this procedure until further error message boxes disappear and Your program compiles, links and starts as expected.
Version2: Finish draw1.
Write three additional lines into the constructor public window1() below the line
    textBox.FontFamily = new FontFamily( "Courier New" );
    textBox.FontSize = 12;
    canvas.Background = new LinearGradientBrush( Colors.Red, Colors.Blue, 90 );
Write an additional line in both event handlers:
in ... OnMouseDown( ... ) below p.Points.Add( p0 ); and in
in ... OnMouseMove( ... ) below p.Points.Add( p1 );:
textBox.Text = p0.X.ToString() + '/' + p0.Y.ToString();
Exercise:
Try out other gradient angles than 90 in
Vertices is the plural of the Latin word vertex = corner = computer graphics term for a point of a polygon.
Version3: Finish draw1.
Mark any registered mouse coordinate with a small vertexCircle of diameter 5 by writing
... OnMouseDown( ... ) and in
... OnMouseMove( ... )
Replace all three event handlers by:
  protected override void OnMouseDown( MouseButtonEventArgs args )
  { canvas.Children.Clear();         //erase everything from the canvas
    canvas.Children.Add( p );        //except the polygon
    canvas.Children.Add( textBox );  //and the textbox
    p.Points.Clear();                //erase everything from the polygon
    p0 = args.GetPosition( canvas ); //get   mouse position
    p.Points.Add( p0 );              //store mouse position
    textBox.Text = p0.X.ToString() + '/' + p0.Y.ToString();
    vertexCircle( p0 );              //mark this vertex
    pressed = true;
  }
  protected override void OnMouseMove( MouseEventArgs args )
  { if ( !pressed ) return;
    p1 = args.GetPosition( canvas ); //get   mouse position
    p.Points.Add( p1 );              //store mouse position
    textBox.Text = p0.X.ToString() + '/' + p0.Y.ToString();
    vertexCircle( p1 );              //mark this vertex
    p0 = p1;                         //old end is new start
  }
  protected override void OnMouseUp( MouseButtonEventArgs args )
  { p.Points.Add ( p.Points[0] );   //close polygon
    pressed = false;
  }
  void vertexCircle( Point p )       //vertex marker function
  { Ellipse elli = new Ellipse();
    elli.Width = elli.Height = 5;    //diameter
    elli.Stroke = Brushes.Black;
    canvas.Children.Add( elli );     //add it to the canvas
    Canvas.SetLeft( elli, p.X - 2 ); //x-position on the canvas
    Canvas.SetTop ( elli, p.Y - 2 ); //y-position on the canvas
  }
Click Debug and Start Debugging F5.
Exercises:
1) Try out other vertexCircle diameters in elli.Width = elli.Height = 5;.
2) Try out other vertexCircle colors in elli.Stroke = Brushes.Black;.
Draw fastly and slowly with the mouse and notice how the density of vertices depends on the drawing speed.
Slow computers produce less vertices than fast ones, because their operating system produces less Windows messages WM_MouseMove to be sent to class window1 activating the event handler
Important: The program is not able to deliver a constant amount of vertices. The vertex density depends on the drawing velocity and on the hardware. When You draw slowly, a fast computer produces too much vertices with minimal distances. You can obtain funny effects when You increase the diameter of vertexCircle: f.i. from 5 to 80.
Version4: Finish draw1.
Insert three additional lines in
    double dx = p1.X - p0.X;
    double dy = p1.Y - p0.Y;
    if ( dx*dx + dy*dy < 400 ) return;
Click Debug and Start Debugging F5.
We derive benefit from the Pythagorean theorem: In a right triangle, the square of the length of the hypotenuse is equal to the sum of the squares of the lengths of the legs: dx2 * dy2 = d2. In our case let's ignore any vertex, if the hypotenuse length is less than 20 points. Draw speedy and slowly and observe the resulting vertex density. Replace the number 400 by 0, 4, 16, 64, 400, 900, 1600 etc.
Please notice how the no. of vertices decreases without impairing drawing quality.
Version5: Finish draw1.
Write an additional declaration into the head of public class window1 : Window below the line
Point mid_of_polygon = new Point();
Change protected override void OnMouseUp( MouseEventArgs args ) until it looks like that:
  protected override void OnMouseUp( MouseButtonEventArgs args )
  { p.Points.Add ( p.Points[0] ); //closed polygon
              mid_of_polygon          = new Point( 0, 0 );
    Point     mid_of_minmax           = new Point( 0, 0 );
    Rectangle minmax_rectangle        = new Rectangle();
    Rectangle mid_of_minmax_rectangle = new Rectangle();
    Ellipse   mid_of_polygon_circle   = new Ellipse  ();
    Double perimeter = 0, area = 0;
    Double xmin, xmax, ymin, ymax;
    xmin = xmax = p0.X = p.Points[0].X;
    ymin = ymax = p0.Y = p.Points[0].Y;
    for ( int i=1; i < p.Points.Count; i++ )
    { p1 = p.Points[i];
      Double dx = p1.X - p0.X;
      Double dy = p1.Y - p0.Y;
      Double my = (p0.Y + p1.Y) / 2.0;
      perimeter  += Math.Sqrt( dx*dx + dy*dy ); //Pythagoras
      area       += dx * my;                    //Trapezoid formula
      if ( p1.X < xmin ) xmin = p1.X; //shift the left  wall to the left
      if ( p1.X > xmax ) xmax = p1.X; //shift the right wall to the right
      if ( p1.Y < ymin ) ymin = p1.Y; //shift the upper wall upward
      if ( p1.Y > ymax ) ymax = p1.Y; //shift the lower wall downward
      mid_of_polygon.X += p1.X; //sum up all x-coordinates
      mid_of_polygon.Y += p1.Y; //sum up all x-coordinates
      p0 = p1; //set the new start to the former end
    }
    mid_of_minmax.X = ( xmax + xmin ) / 2; //mid between left  and right border
    mid_of_minmax.Y = ( ymax + ymin ) / 2; //mid between upper and lower border
    mid_of_polygon.X /= p.Points.Count-1;  //mean of all x-coordinates
    mid_of_polygon.Y /= p.Points.Count-1;  //mean of all y-coordinates
    mid_of_minmax_rectangle   .Width = mid_of_minmax_rectangle   .Height = 5;
    mid_of_polygon_circle.Width = mid_of_polygon_circle.Height = 5;
    minmax_rectangle.Width  = xmax - xmin + 2;
    minmax_rectangle.Height = ymax - ymin + 2;
    Canvas.SetLeft( minmax_rectangle       , xmin                 );
    Canvas.SetTop ( minmax_rectangle       , ymin                 );
    Canvas.SetLeft( mid_of_minmax_rectangle, mid_of_minmax .X - 2 );
    Canvas.SetTop ( mid_of_minmax_rectangle, mid_of_minmax .Y - 2 );
    Canvas.SetLeft( mid_of_polygon_circle  , mid_of_polygon.X - 2 );
    Canvas.SetTop ( mid_of_polygon_circle  , mid_of_polygon.Y - 2 );
    canvas.Children.Add( minmax_rectangle           );
    canvas.Children.Add( mid_of_minmax_rectangle    );
    canvas.Children.Add( mid_of_polygon_circle      );
    minmax_rectangle.Stroke = mid_of_minmax_rectangle.Stroke = mid_of_polygon_circle.Stroke = Brushes.Black;
    textBox.Text  = String.Format( "Vertices  = {0}\n"     , p.Points.Count-1 );
    textBox.Text += String.Format( "Perimeter = {0,2:F1}\n", perimeter );
    textBox.Text += String.Format( "Area      = {0,2:F1}"  , area );
    pressed = false;
  }
Click Debug and Start Debugging F5.
Try out the program and investigate the coherence between the code of OnMouseUp and the graphics output.
Please Notice:
1) The sign of Area depends on whether you draw clockwise or counter clockwise.
2) There are two definitions of the midpoint that differ:
2a) - the mid of the bounding marked by a small rectangle and
2b) - the center of gravity of the vertices marked by a small circle.
Exercise:
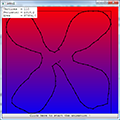
Try to draw a square of 100x100 points as exactly as you can. The resulting Perimeter is about 400 and the Area is about 10000 or -10000.
The theory of perimeter, area, bounding box, center of gravity etc. can be found here: Lecture on 2D Vector Graphics.
Version6: Finish draw1.
Include an additional namespace in the head of draw1.cs below the line
using System.Windows.Threading;
Write three additional declarations in the head of public class window1 : Window below the line
  Button    button  = new Button();
  int       tickcount = 0;
  DispatcherTimer timer = new DispatcherTimer();
Write four additional lines into the constructor public window1() below the line
    button.Click += buttonOnClick;
    button.Content = "Click here to start the animation !";
    timer.Interval = TimeSpan.FromMilliseconds( 1 );
    timer.Tick += TimerOnTick;
Insert two new lines at the end of ... OnMouseUp( ... ) below the line
    canvas.Children.Add( button );
    OnRenderSizeChanged( null );
Write three new event handler functions below the existing ones but above the final bracket:
  protected override void OnRenderSizeChanged( SizeChangedInfo sizeInfo )
  { Canvas.SetLeft( button, 0                      );
    Canvas.SetTop ( button, canvas.ActualHeight-20 );
    button.Width = canvas.ActualWidth;
  }
  void buttonOnClick( Object sender, RoutedEventArgs rea )
  { canvas.Children.Clear();
    canvas.Children.Add( p );
    timer.Start();
  }
  void TimerOnTick( Object sender, EventArgs args )
  { if ( tickcount < 360 ) tickcount++;
    else   { timer.Stop(); tickcount = 0; return; }
    double arcus   = 2*Math.PI / 360;
    double cosinus = Math.Cos( arcus );
    double   sinus = Math.Sin( arcus );
    double zoom    = 1.0;
    if ( tickcount < 90 || tickcount > 270 ) zoom = 0.99;
    else                                     zoom = 1.01;
    for ( int i=0; i < p.Points.Count; i++ )
    { Point pp = p.Points[i];
      double x = zoom * ( pp.X - mid_of_polygon.X );
      double y = zoom * ( pp.Y - mid_of_polygon.Y );
      pp.X = x*cosinus - y*sinus + mid_of_polygon.X;
      pp.Y = x*sinus + y*cosinus + mid_of_polygon.Y;
      p.Points[i] = pp;
    }
  }
Click Debug and Start Debugging F5.
Explanations:
1) The event handler ... OnRenderSizeChanged( ... ) creates a flat but broad command button at the bottom of the canvas and makes sure it will keep canvas' width when window1 is resized.
2) The event handler void buttonOnClick( ... ) clears everything but the polygon from the canvas and starts the animation.
3) The event handler void TimerOnTick( ... ) rotates the polygon from 0 to 360 degrees. During the rotation the polygon shrinks from 0° to 89°, grows from 90° to 270° and shrinks again from 271° to 360°. After this rotation the polygon is back on its original size and position.
Exercises:
1) Try out time spans of 50, 100 between the ticks in timer.Interval = TimeSpan.FromMilliseconds( 1 );.
2) Try out more tick counts in if ( tickcount < 360 ) tickcount++;.
3) Try out less or more angular increments in double arcus = 2*Math.PI / 360;.
4) Try out zoom values of 0.95 and 1.05 and others.
5) Revert the rotation direction by inverting the signs in front of both terms y*sinus and x*sinus.
The theory of zoom and 2D-rotation can be found here: Lecture on 2D Vector Graphics.
Version7: Finish draw1.
In the window titled: Solution Explorer -Solution 'draw1' (1 project) we have to add an additional Reference:
Right-click the branch References. A drop-down menu appears.
Include an additional namespace in the head of draw1.cs below the line
using System.Windows.Markup;
using System.IO;
Insert two new lines at the end of the event handler
    FileStream f = new FileStream( "C:\\temp\\draw1\\canvas.xaml", FileMode.Create, FileAccess.Write );
    XamlWriter.Save( canvas, f );
Try out the program, save and exit Visual C# 2010 Express and look for C:\temp\draw1\canvas.xaml.
Exercises:
1) Double click C:\temp\draw1\canvas.xaml. The Internet Explorer will show our canvas as browser object.
2) Start Notepad or Textpad and have a look on C:\temp\draw1\canvas.xaml. You will find the XAML-descriptions of the canvas and all its children. Unfortunatly all tags are written continously. In order to put them in an understandable hierarchical format, you have to edit the text file and indent the tags.
3) Change the x- and y-coordinates of the last vertex of the polygon to 0, 0" and save the XAML-file and start it again via the Internet Explorer.
The complete code of draw1 (without Version 7) can be found here: C2D_WPF_Draw_Code.htm.
| top of page: |