
Course 3D_XNA: 3D-Computer Graphics with XNA
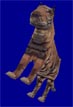
Chapter C3: Drunken Tiger
Copyright © by V. Miszalok, last update: 25-09-2010
Let me know
what you think
| Home | Course Index | << Prev. | Next >> | C3 Code Comments | PDF Version of this Page |
|
Course 3D_XNA: 3D-Computer Graphics with XNA
|
|
|
Let me know what you think |
|
This chapter is a subcompact summary of the first XNA-Tutorial from Microsoft.
You find the tutorial here: VS 2010 →
|
1. Main Menu after starting VS 2010:
|
   |
Write the following code into the empty code window of Game1.cs:
using System;
using Microsoft.Xna.Framework;
using Microsoft.Xna.Framework.Graphics;

static class Program
{ [STAThread] static void Main() { Game1 game = new Game1(); game.Run(); }

public class Game1 : Microsoft.Xna.Framework.Game
{ private GraphicsDeviceManager g;
  private Model model;
  private BasicEffect effect;
  public Game1()
  { g = new GraphicsDeviceManager( this );
  }
  protected override void LoadContent()
  { model = Content.Load< Model >("Content\\tiger");
    effect = (BasicEffect)model.Meshes[0].Effects[0];
    effect.View = Matrix.CreateLookAt( new Vector3( 0f, 0f, 4f ), //camera position
                                       Vector3.Zero, Vector3.Up );
    effect.Projection = Matrix.CreatePerspectiveFieldOfView
                               ( MathHelper.Pi/4, 1f, 1f, 100000f );
  }
  protected override void Draw( GameTime gameTime )
  { model.Meshes[0].Draw();
  }
} // end of class Game1
} // end of class Program
Click Debug → Start Without Debugging Ctrl F5.
| Experiments | with camera position |
| initial | new Vector3( 0f, 0f, 4f ) |
| nearer | new Vector3( 0f, 0f, 3f ) |
| more distant | new Vector3( 0f, 0f, 6f ) |
| to the rear | new Vector3( 0f, 0f, -4f ) |
| to the right | new Vector3( 3f, 0f, 4f ) |
| to the left | new Vector3( -3f, 0f, 4f ) |
| upwards | new Vector3( 0f, 3f, 4f ) |
| downwards | new Vector3( 0f, -3f, 4f ) |
Insert the following event handler below the constructor:
protected override void Initialize()
  { g.PreferredBackBufferWidth  = 600;
    g.PreferredBackBufferHeight = 600;
    g.ApplyChanges();
    Window.Title = "Tiger Rotation";
    Window.AllowUserResizing = true;
    base.Initialize();
  }
Click Debug → Start Without Debugging Ctrl F5.
Insert the following global variable definitions below the constructor:
  private float trans             = 0,
                transIncrement    = 0.02f,
                zoom              = 1,
                zoomIncrement     = 0.005f,
                rotation          = 0,
                rotationIncrement = 0.01f;
Change the
  protected override void Draw( GameTime gameTime )
  { //g.GraphicsDevice.RenderState.FillMode = FillMode.WireFrame;
    g.GraphicsDevice.Clear( Color.DarkBlue );
    effect.World = Matrix.CreateRotationY ( modelRotation += 0.01f );
    model.Meshes[0].Draw();
  }
Click Debug → Start Without Debugging Ctrl F5.
| Experiments | with the camera | Results |
| 1. | In the effect.World-line replace the letter "Y" in CreateRotationY to "X". | looping around the X-axis |
| 2. | In the effect.World-line replace the letter "Y" in CreateRotationY to "Z" | looping around the Z-axis |
| 3. | In the effect.World-line replace "0.01f" by "0.05f". | 5 times faster ≈ 3°/Draw |
| 4. | In the effect.World-line replace "0.01f" by "0.001f". | 10 times slower ≈ 0.06°/Draw |
| 5. | In the effect.Projection-line replace "MathHelper.Pi/4" by "MathHelper.Pi/6". | camera angle shrinks from 45° to 30° |
| 6. | In the effect.Projection-line replace "MathHelper.Pi/4" by "MathHelper.Pi/2". | camera obtains a wide angle of 90° |
| 7. | In the effect.Projection-line replace the 2. parameter "1f" by "0.5f". | distorted image: width = 2*height |
| 8. | In the effect.Projection-line replace the 2. parameter "1f" by "2f". | distorted image: height = 2*width |
| 9. | In the effect.Projection-line replace the 3. parameter "1f" by "3f". | Head an tail closer than 3f are lost. |
| Experiments | with the GraphicsDeviceManager g | |
| 1. | Remove the comment slashes "//" in front of the first line of the new Draw-function. | triangles without skin |
| 2. | Insert comment slashes "//" in front of the second line of the new Draw-function. | rotational body |
Replace protected override void Draw( GameTime gameTime ) { ... } by:
protected override void Draw( GameTime gameTime )
  { //g.GraphicsDevice.RenderState.FillMode = FillMode.WireFrame;
    g.GraphicsDevice.Clear( Color.DarkBlue );
    if ( trans < -0.8f | trans > 0.8f ) transIncrement *= -1f;
    if ( zoom  <  0.1f | zoom  > 1.2f ) zoomIncrement  *= -1f;
    trans    += transIncrement;
    zoom     += zoomIncrement;
    rotation += rotationIncrement;
    effect.World  = Matrix.CreateScale      ( zoom        );
    effect.World *= Matrix.CreateRotationX  ( rotation    );
    effect.World *= Matrix.CreateRotationY  ( rotation    );
    effect.World *= Matrix.CreateRotationZ  ( rotation    );
    effect.World *= Matrix.CreateTranslation( trans, 0, 0 );
    model.Meshes[0].Draw();
  }
There are two faster alternatives to code the cascading movements by effect.World-lines:
/*1*/effect.World  = Matrix.CreateScale      ( zoom        ) *
                     Matrix.CreateRotationX  ( rotation    ) *
                     Matrix.CreateRotationY  ( rotation    ) *
                     Matrix.CreateRotationZ  ( rotation    ) *
                     Matrix.CreateTranslation( trans, 0, 0 );
/*2*/effect.World  = Matrix.CreateScale           ( zoom                         ) *
                     Matrix.CreateFromYawPitchRoll( rotation, rotation, rotation ) *
                     Matrix.CreateTranslation     ( 0, trans, 0                  );
Experiments:
1. Change the values of transIncrement, zoomIncrement and rotationIncrement.
2. Replace (trans, 0, 0) by (0, trans, 0).
3. Remove single Matrix.xxx-lines by comment-slashes "//".
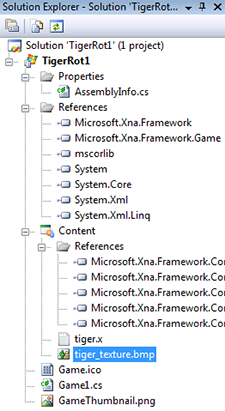
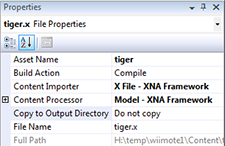
In the Solution Explorer TigerRot1-window open the Content-branch. → Double click tiger.x. →
A text file tiger.x opens. It contains 3 important parts:
1. 303 lines defining 303 3D-vertices = Vertex Buffer
2. 599 lines defining 599 triangles = Index Buffer and
3. 303 lines defining 303 2D-coordinates = Texture Coordinates Buffer.
This file has been produced by a diligent external designer using 3D modeling software such as Autodesk 3ds Max or Autodesk Maya (complete list of 3D modeling programs).
Let us edit tiger.x in order to see how x-files work.
1. Experiment: Comment out the last vertex (vertex no. 303) of the Vertex Buffer:
The end of the vertex Buffer should look like this:
//-0.213423;-0.066057;0.311063;;
-0.6;-0.066057;0.6;;
Store tiger.x and run the program. The tiger's right hind leg looks strange with a big tapered tumor.
2. Experiment: Comment out the first 5 lines
// 599;
//3;300,301,302;,
//3;299,300,302;,
//3;298,300,299;,
//3;295,296,297;,
595;
3;294,295,297;, ......
Store tiger.x and run the program. The tiger's right hind leg looks even stranger with a big defect in and near the tumor.
Write the following code into the empty code window of Game1.cs:
using System;
using Microsoft.Xna.Framework;
using Microsoft.Xna.Framework.Graphics;

static class Program
{ [STAThread] static void Main() { Game1 game = new Game1(); game.Run(); }

public class Game1 : Microsoft.Xna.Framework.Game
{ private GraphicsDeviceManager g;
  private Model model;
  private BasicEffect effect;
  private float trans             = 0,
                transIncrement    = 0.02f,
                zoom              = 1,
                zoomIncrement     = 0.005f,
                rotation          = 0,
                rotationIncrement = 0.01f;
  public Game1()
  { g = new GraphicsDeviceManager( this );
  }
  protected override void Initialize()
  { g.PreferredBackBufferWidth  = 600;
    g.PreferredBackBufferHeight = 600;
    g.ApplyChanges();
    Window.Title = "Tiger Rotation";
    Window.AllowUserResizing = true;
    base.Initialize();
  }
  protected override void LoadContent()
  { model = Content.Load< Model >("Content\\tiger");
    effect = (BasicEffect)model.Meshes[0].Effects[0];
    effect.View = Matrix.CreateLookAt( new Vector3( 0f, 0f, 4f ),
                                       Vector3.Zero, Vector3.Up );
    effect.Projection = Matrix.CreatePerspectiveFieldOfView
                               ( MathHelper.Pi/4, 1f, 1f, 100000f );
  }
protected override void Draw( GameTime gameTime )
  { //g.GraphicsDevice.RenderState.FillMode = FillMode.WireFrame;
    g.GraphicsDevice.Clear( Color.DarkBlue );
    if ( trans < -0.8f | trans > 0.8f ) transIncrement *= -1f;
    if ( zoom  <  0.1f | zoom  > 1.2f ) zoomIncrement  *= -1f;
    trans    += transIncrement;
    zoom     += zoomIncrement;
    rotation += rotationIncrement;
    effect.World  = Matrix.CreateScale      ( zoom        );
    effect.World *= Matrix.CreateRotationX  ( rotation    );
    effect.World *= Matrix.CreateRotationY  ( rotation    );
    effect.World *= Matrix.CreateRotationZ  ( rotation    );
    effect.World *= Matrix.CreateTranslation( trans, 0, 0 );
    model.Meshes[0].Draw();
  }
} // end of class Game1
} // end of class Program
Let us replace the tiger by another 3D-model.
1. Right click this link: ship_texture.tga and store the texture into the project directory
2. Right click this link: ship.fbx and store the mesh into the project directory
3. We have to add the texture image and the mesh file to project TigerRot1:
Solution Explorer → Right click the branch Content → Add →
Select both ship_texture.tga and ship.fbx, and quit by clicking the Add-button and check whether both file names arrived underneath the Content-branch.
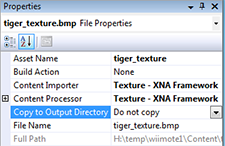
4. Solution Explorer → Click ship_texture.tga and in its Properties-window and change the Build Action-property from Compile to None.
5. We have to call the ship-model instead of the tiger by changing the Content.Load-line to:
6. The ship is much bigger than the tiger. Thus we have to retract the camera
from
to
7. Click Debug → Start Without Debugging Ctrl F5.
| top of page: |