
Course 2D_WPF: 2D-Computer Graphics with C# + WPF
Chapter C1: The Intro Project Written in Pure C#
Copyright © by V. Miszalok, last update: 2011-01-31
Let me know
what you think
| Home | Course Index | Next >> | C1 Complete Code | C1 Code Comments | PDF Version of this Page |
|
Course 2D_WPF: 2D-Computer Graphics with C# + WPF
|
|
Let me know what you think |
Guidance for Visual C# 2010 Express, see Introduction into all Courses.
1) Main Menu after start of VC# 2010: Tools → Options → check lower left checkbox: Show all Settings → Projects and Solutions → Visual Studio projects location: → C:\temp
2) Main Menu after start of VC# 2010: File → New Project... → Visual Studio installed templates: Empty project
Name: intro1 → Location: C:\temp → Create directory for solution: switch off → OK.
| 3) In the window titeld: Solution Explorer -Solution 'intro1' (1 project) we have to add 4 References and an intro1.cs file: 3.1 Right-click the branch References. A drop-down menu appears. 3.2 Right-click the branch intro1. A drop-down menu appears. |
The Solution Explorer should show this: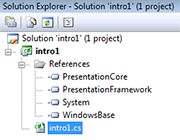 |
4) Main menu of VC# 2010 → Project →
5) Stop the automatic code formatter before it will drive you crazy.
Main menu of VC# 2010 → Tools →
Click General. Uncheck all three check boxes.
Click Indentation. Uncheck all four check boxes.
Click New Lines. Uncheck all thirteen check boxes.
Click Spacing. Uncheck all twenty three check boxes.
Click IntelliSense. Uncheck all six check boxes.
6) Write the following three lines into the empty intro1.cs:
public class window1 : System.Windows.Window
{ [System.STAThread] static void Main() { new System.Windows.Application().Run( new window1() ); }
}
7) Click Debug in the main menu of VC# 2010.
A submenu opens. Click Start Debugging F5.
The rudimentary program now automatically compiles, links and starts. Please observe the Error List-window of Visual Studio below our program.
Our program starts automatically as stand-alone window containing three parts:
- main window = MainFrame with a blue title row
- three buttons Minimize, Maximize, Close
- a narrow frame with 4 movable borders and 4 movable edges. Enlarge and shrink the window by dragging its borders and edges.
- Finish the program.
Build the project: Debug → Build Solution F6.
Save the project: File → Save All Ctrl+Shift+S → Name: intro1 → Location: C:\temp → uncheck Create directory for solution → Save.
Minimize VC# 2010.
intro1.exe can now be started as a stand-alone windows program as follows:
- Look for C:\temp\intro1\bin\Release.
- Double click intro1.exe.
- You can start an arbitrary number of instances of intro1.exe.
- (Caution: You will have kill all instances before You can write new versions.)
Important: Always finish all instances of intro1 before writing new code and starting it !
Start the Task Manager with Ctrl+Alt+Del and check if any intro1.exe-processes are still running and kill them.
Delete everything from intro1.cs (including the last brace). No code remains.
Write the following lines into the empty intro1.cs:
using System;
using System.Windows;
using System.Windows.Media;
public class window1 : Window
{ [STAThread] static void Main() { new Application().Run( new window1() ); }
  public window1() //constructor
  { Top = Left = 50;
    Width = Height = 300;
    Title = "intro1";
    Background = new SolidColorBrush( Colors.Cornsilk );
    //Background = new LinearGradientBrush( Colors.Red, Colors.Blue, 90 );
    //Background = new RadialGradientBrush( Colors.White, Colors.Red );
    Foreground = new SolidColorBrush( Color.FromRgb( 0, 0 ,255 ) );
    Content = "Hello World " + DateTime.Now.ToString();
  }
}
Click the Debug-tab of the main menu obove the main window.
A sub-menu opens. Click Start Debugging F5.
The program automatically compiles, links and starts again.
Exercises: Try out other start positions, other window sizes, other strings, other brushes and other colors.
Important Tip: In case of mistype the compiler presents a Message Box: There were build errors. .... You quit with No. An Error List-window with warnings and errors will appear in Visual Studio below Your program. In this error list scroll up to the first error (ignore the warnings !). Double click the line with the first error. The cursor jumps automatically into Your code into the line where the error was detected. Look for mistypes in this line and remove them. (Sometimes You will not find the error in this line but above, where You forgot a comma or a semicolon.) Ignore all errors below the first error (in most cases they are just followers of the first one) and compile. Repeat this procedure until further error message boxes disappear and Your program compiles, links and starts as expected.
Version 2: Finish intro1.
Replace the complete code of version 1 by this one:
using System;
using System.Windows;
using System.Windows.Media;
using System.Windows.Controls;

public class window1 : Window
{ [STAThread] static void Main() { new Application().Run( new window1() ); }
  DockPanel myPanel  = new DockPanel();
  TextBox   central  = new TextBox();

  public window1() //constructor
  { Top = Left = 50;
    this.Width = this.Height = 500;
    this.Title = "intro1";
    myPanel.Children.Add( central );
    //Background = new SolidColorBrush( Colors.Cornsilk );
    //Background = new RadialGradientBrush( Colors.White, Colors.Green );

    Background = new LinearGradientBrush( Colors.Red, Colors.Blue, 90 );
    FontFamily = new FontFamily( "Courier New" );
    FontSize = 12;
    central.HorizontalAlignment = HorizontalAlignment.Center;
    central.VerticalAlignment   = VerticalAlignment.Center;
    OnRenderSizeChanged( null );
  }

  protected override void OnRenderSizeChanged( SizeChangedInfo sizeInfo )
  { String s1 = "Hello World " + DateTime.Now.ToString() + "\n";
    int width  = Convert.ToInt32( this.Width  );
    int height = Convert.ToInt32( this.Height );
    String s2 = "Window Size = " + width.ToString() + " x " + height.ToString();
    central.Text = s1 + s2;
    Content = myPanel;
  }
}
Click Debug in the main menu above the main window and Start Debugging F5.
Drag the window border and observe the content of the text box.
Version 3: Finish intro1.
Write 4 additional declarations in the head of public class window1 : Window below the line
  TextBox   left     = new TextBox();
  TextBox   top      = new TextBox();
  TextBox   right    = new TextBox();
  TextBox   bottom   = new TextBox();
Write 4 additional lines into the constructor public window1() below the line
    myPanel.Children.Add( top    ); DockPanel.SetDock( top   , Dock.Top    ); top   .Text = "top";
    myPanel.Children.Add( bottom ); DockPanel.SetDock( bottom, Dock.Bottom ); bottom.Text = "bottom";
    myPanel.Children.Add( left   ); DockPanel.SetDock( left  , Dock.Left   ); left  .Text = "left";
    myPanel.Children.Add( right  ); DockPanel.SetDock( right , Dock.Right  ); right .Text = "right";
Replace the lines
central.HorizontalAlignment = HorizontalAlignment.Center;
central.VerticalAlignment = VerticalAlignment.Center;
by:
    foreach( TextBox text in myPanel.Children )
    { text.HorizontalAlignment = HorizontalAlignment.Center;
      text.VerticalAlignment   = VerticalAlignment.Center;
    }
Click Debug and Start Debugging F5.
Drag the window border and observe the content of the text box.
Version 4: Finish intro1.
Insert a new namespace below using System.Windows.Controls;:
using System.Windows.Shapes;
Write 5 additional declarations in the head of public class window1 : Window just below the line
  Canvas    myCanvas = new Canvas();
  Line      line1    = new Line();
  Line      line2    = new Line();
  Rectangle rect     = new Rectangle();
  Ellipse   elli     = new Ellipse();
Write 4 additional lines into the constructor public window1() below the line
    myCanvas.Children.Add( line1 );
    myCanvas.Children.Add( line2 );
    myCanvas.Children.Add( rect  );
    myCanvas.Children.Add( elli  );
    myCanvas.Children.Add( myPanel );
Below the existing foreach-block
foreach( TextBox text in myPanel.Children )
{ text.HorizontalAlignment = HorizontalAlignment.Center;
text.VerticalAlignment = VerticalAlignment.Center;
}
write 6 new lines:
    foreach( Object obj in myCanvas.Children )
    { if ( obj.GetType() == typeof(DockPanel) ) continue;
      ((Shape)obj).Stroke = Brushes.Black;
      ((Shape)obj).StrokeThickness = 5;
    }
    rect.Fill = Brushes.White;
Inside the protected override void OnRenderSizeChanged( ... )-function replace the line
    line1.X1 = 0; line1.Y1 = 0; line1.X2 = myCanvas.ActualWidth; line1.Y2 = myCanvas.ActualHeight;
    line2.X1 = myCanvas.ActualWidth; line2.Y1 = 0; line2.X2 = 0; line2.Y2 = myCanvas.ActualHeight;
    Canvas.SetLeft( rect, myCanvas.ActualWidth /5 );
    Canvas.SetLeft( elli, myCanvas.ActualWidth /5 );
    Canvas.SetTop ( rect, myCanvas.ActualHeight/5 );
    Canvas.SetTop ( elli, myCanvas.ActualHeight/5 );
    rect .Width  = elli.Width  = 3 * myCanvas.ActualWidth  / 5;
    rect .Height = elli.Height = 3 * myCanvas.ActualHeight / 5;
    myPanel.Width  = myCanvas.ActualWidth;
    myPanel.Height = myCanvas.ActualHeight;
    Content = myCanvas;
Click Debug and Start Debugging F5.
Drag the window border and observe the content of the central text box.
Version 5: Finish intro1.
Insert a new namespace below using System.Windows.Controls;:
using System.Windows.Threading;
Write an additional declaration in the head of public class window1 : Window below the line
double zoom = 1.1;
In the constructor public window1() replace the line
    DispatcherTimer myTimer = new DispatcherTimer();
    myTimer.Interval = TimeSpan.FromMilliseconds( 40 );
    myTimer.Tick += TimerOnTick;
    myTimer.Start();
Below the constructor public window1() write a new function:
  private void TimerOnTick( Object sender, EventArgs args )
  { if ( myCanvas.ActualWidth < 200 ) zoom = 1.1;
    if ( myCanvas.ActualWidth > 800 ) zoom = 0.99;
    this.Width    *= zoom;
    this.Height   *= zoom;
    this.FontSize *= zoom;
  }
Inside the protected override void OnRenderSizeChanged( ... )-function replace the lines:
String s1 = "Hello World " + DateTime.Now.ToString() + "\n";
int width = Convert.ToInt32( this.Width );
int height = Convert.ToInt32( this.Height );
String s2 = "Window Size = " + width.ToString() + " x " + height.ToString();
central.Text = s1 + s2;
by:
String s1 = "Hello World " + DateTime.Now.ToString() + "\n";
int width = Convert.ToInt32( this.Width );
int height = Convert.ToInt32( this.Height );
String s2 = "Window Size = " + width.ToString() + " x " + height.ToString() + "\n";
width = Convert.ToInt32( myCanvas.ActualWidth );
height = Convert.ToInt32( myCanvas.ActualHeight );
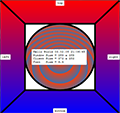
String s3 = "Client Size = " + width.ToString() + " x " + height.ToString() + "\n";
String s4 = String.Format( "Font Size = {0,2:F1}", this.FontSize );
central.Text = s1 + s2 + s3 + s4;
Click Debug and Start Debugging F5.
Observe the content of the central text box.
Version 6: Finish intro1.
Write three additional declarations in the head of public class window1 : Window below the line
  double angle = 0;
  Random r = new Random();
  Byte r1, g1, b1, r2, g2, b2;
In the constructor public window1() below the line rect.Fill = Brushes.White; insert two new lines:
    r1 = (Byte)r.Next(255); g1 = (Byte)r.Next(255); b1 = (Byte)r.Next(255);
    r2 = (Byte)r.Next(255); g2 = (Byte)r.Next(255); b2 = (Byte)r.Next(255);
Inside the protected override void OnRenderSizeChanged( ... )-function below the line:
rect .Height = elli.Height = 3 * myCanvas.ActualHeight / 5; write 8 new lines:
    Color color1 = Color.FromRgb( r1++, g1++, b1++ );
    Color color2 = Color.FromRgb( r2++, g2++, b2++ );
    RadialGradientBrush brush = new RadialGradientBrush( color1, color2 );
    brush.SpreadMethod = GradientSpreadMethod.Repeat;
    brush.RadiusX = brush.RadiusY = 0.1;
    //brush.GradientOrigin = new Point( 0.5+0.05*Math.Cos(angle), 0.5+0.05*Math.Sin(angle) );
    elli.Fill = brush;
    angle += Math.PI / 32;
Click Debug and Start Debugging F5.
Remove the comment slashes // in front of
The complete code of intro1 can be found here:
C2D_WPF_Intro_CS_Only_Code.htm in the version intro1.cs driven by a DispatcherTimer Object.
On this page an interesting second version can be found: intro1.cs driven by a DoubleAnimation Object.
1) Change the initial window size from
this.Width = this.Height = 500; to
this.Width = 600; this.Height = 300;
2) Change the gradient angle of the Background-brush from
Background = new LinearGradientBrush( Colors.Red, Colors.Blue, 90 ); to
Background = new LinearGradientBrush( Colors.Red, Colors.Blue, 45 );.
3) Change the font from
FontFamily = new FontFamily( "Courier New" ); to
FontFamily = new FontFamily( "Arial Italic" );
4) Change the stroke thickness from
((Shape)obj).StrokeThickness = 5; to
((Shape)obj).StrokeThickness = 10;.
5) Change the timer interval from
myTimer.Interval = TimeSpan.FromMilliseconds( 40 ); to
myTimer.Interval = TimeSpan.FromMilliseconds( 400 );
6) Lower the minimal window size and the zoom speed from
if ( myCanvas.ActualWidth < 200 ) zoom = 1.1; to
if ( myCanvas.ActualWidth < 100 ) zoom = 1.01;
7) Increase the maximal window size and the down zoom speed from
if ( myCanvas.ActualWidth > 800 ) zoom = 0.99; to
if ( myCanvas.ActualWidth > 1024 ) zoom = 0.98;
8) Reduce the number of rings of the elliptical brush from
brush.RadiusX = brush.RadiusY = 0.1; to
brush.RadiusX = brush.RadiusY = 0.15;
9) Speed up the angular velocitiy of the radial center of the brush from
angle += Math.PI / 32; to
angle += Math.PI / 8;
1. MiniHello:
using System;
using System.Windows;
using System.Windows.Controls;
using System.Windows.Media;

public class window1 : Window
{ [STAThread] static void Main() { new Application().Run( new window1() ); }
  public window1() //constructor
  { Top = Left = 50;
    Width = Height = 300;
    Title = "MiniHello";
    Background = new RadialGradientBrush( Colors.White, Colors.Red );
    TextBox myTextBox = new TextBox();
    myTextBox.Text = "Hello World";
    myTextBox.HorizontalAlignment = HorizontalAlignment.Center;
    myTextBox.VerticalAlignment   = VerticalAlignment.Center;
    Content = myTextBox;
  }
}
2. MiniCross:
using System;
using System.Windows;
using System.Windows.Controls;
using System.Windows.Media;
using System.Windows.Shapes;

public class window1 : Window
{ [STAThread] static void Main() { new Application().Run( new window1() ); }
  Canvas myCanvas = new Canvas();
  Line   line1    = new Line();
  Line   line2    = new Line();
  public window1() //constructor
  { Top = Left = 50;
    Width = Height = 300;
    Title = "MiniCross";
    Background = new RadialGradientBrush( Colors.White, Colors.Red );
    myCanvas.Children.Add( line1 );
    myCanvas.Children.Add( line2 );
    line1.Stroke = Brushes.Black; line1.StrokeThickness = 5;
    line2.Stroke = Brushes.Black; line2.StrokeThickness = 5;
    OnRenderSizeChanged( null );
  }
  protected override void OnRenderSizeChanged( SizeChangedInfo sizeInfo )
  { line1.X1 = 0; line1.Y1 = 0; line1.X2 = myCanvas.ActualWidth; line1.Y2 = myCanvas.ActualHeight;
    line2.X1 = myCanvas.ActualWidth; line2.Y1 = 0; line2.X2 = 0; line2.Y2 = myCanvas.ActualHeight;
    Content = myCanvas;
  }
}
3. MiniCircle:
using System;
using System.Windows;
using System.Windows.Controls;
using System.Windows.Media;
using System.Windows.Shapes;

public class window1 : Window
{ [STAThread] static void Main() { new Application().Run( new window1() ); }
  Canvas myCanvas = new Canvas();
  Ellipse elli = new Ellipse();
  public window1() //constructor
  { Top = Left = 50;
    Width = Height = 300;
    Title = "MiniCircle";
    Background = new RadialGradientBrush( Colors.White, Colors.Red );
    myCanvas.Children.Add( elli );
    elli.Stroke = Brushes.Black;
    elli.StrokeThickness = 5;
    elli.Fill = new RadialGradientBrush( Colors.Blue, Colors.White );
    OnRenderSizeChanged( null );
  }
  protected override void OnRenderSizeChanged( SizeChangedInfo sizeInfo )
  { Canvas.SetLeft( elli, myCanvas.ActualWidth /5 );
    Canvas.SetTop ( elli, myCanvas.ActualHeight/5 );
    elli.Width  = 3 * myCanvas.ActualWidth  / 5;
    elli.Height = 3 * myCanvas.ActualHeight / 5;
    Content = myCanvas;
  }
}
| Home | Course Index | Next >> | Complete Code | PDF Version of this Page | top of page: |