
Course 3D_WPF: 3D-Computer Graphics with C# + WPF
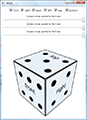
Chapter C3: Dice
Copyright © by V. Miszalok, last update: 2010-01-08
Let me know
what you think
| Home | Course Index | << Prev. | Next >> | Complete Code | PDF Version of this Page |
|
Course 3D_WPF: 3D-Computer Graphics with C# + WPF
|
|
Let me know what you think |
Guidance for Visual C# 2010 Express:
Main Menu after start of VC# 2010 : File → New Project... → WPF Application → Name: dice1 → OK.
Replace the default code of MainWindow.xaml and of MainWindow.xaml.cs by the following codes:
MainWindow.xaml:
<Window x:Class="dice1.MainWindow" x:Name="window"
 xmlns="http://schemas.microsoft.com/winfx/2006/xaml/presentation"
 xmlns:x="http://schemas.microsoft.com/winfx/2006/xaml"
 Title="dice1" Width="400" Height="650">
 <Window.Resources>
  <MeshGeometry3D x:Key="face_prototype"
   Positions=        "-0.5  0.5  0,
                      -0.5 -0.5  0,
                       0.5 -0.5  0,
                       0.5  0.5  0"
   TextureCoordinates="0    0,
                       0    1,
                       1    1,
                       1    0"
   TriangleIndices=   "0    1    3,
                       1    2    3"/>
  <ImageBrush x:Key="frontBrush"  ImageSource="http://www.miszalok.de/C_3D_WPF/C3_Dice/Images/front.bmp" />
  <DiffuseMaterial x:Key="frontMaterial"  Brush="{StaticResource frontBrush }"/>
 </Window.Resources>

 <StackPanel Orientation="Vertical">
  <Viewport3D x:Name="viewport">
   <ModelVisual3D x:Name="model">
    <ModelVisual3D.Content>
     <Model3DGroup x:Name="group">
      <GeometryModel3D x:Name="front"
       Geometry    ="{StaticResource face_prototype}"
       Material    ="{StaticResource frontMaterial}"
       BackMaterial="{StaticResource frontMaterial}"/>
      <DirectionalLight x:Name="directionalLight" Color="#ffffff" Direction="-1 -1 -1" />
     </Model3DGroup><!--end of <Model3DGroup x:Name="group">-->
    </ModelVisual3D.Content>
   </ModelVisual3D><!--end of <ModelVisual3D x:Name="model">-->
   <Viewport3D.Camera>
    <PerspectiveCamera x:Name="camera"
     Position=     " 1.5 1.5 1.5"
     LookDirection="-1  -1  -1"
     UpDirection=  " 0   1   0"/>
   </Viewport3D.Camera>
  </Viewport3D>
 </StackPanel><!--end of <StackPanel Orientation="Vertical">-->
</Window>

MainWindow.xaml.cs:
using System;
using System.Windows;
using System.Windows.Controls;
using System.Windows.Media;
using System.Windows.Media.Imaging;
using System.Windows.Media.Media3D;

namespace dice1
{ public partial class MainWindow : Window
  { public MainWindow() //constructor
    { InitializeComponent();
    }
    protected override void OnRenderSizeChanged(SizeChangedInfo sizeInfo)
    { viewport.Width  = window.ActualWidth;
      viewport.Height = window.ActualHeight;
    }
  }
}
Experiments in MainWindow.xaml: (Restore the original values after the experiments.)
| 1. | Distort the MeshGeometry3D x:Key="face_prototype" by moving its first point from Positions="-0.5 0.5 0, to Positions="-1.2 0.5 0,. |
Trapezoid |
| 2. | Distort the MeshGeometry3D x:Key="face_prototype" by moving its first texture coordinate from TextureCoordinates="0 0, to TextureCoordinates="0.4 0,. |
Clipped image |
| 3. | Shift the PerspectiveCamera to Position="0.0 0.0 1.5" with LookDirection="0 0 -1". | Right angled central view |
| 4. | Shift the PerspectiveCamera to Position="0.0 0.0 -1.5" with LookDirection=" 0 0 1". | Right angled rear view |
| 5. | Restore all original values and try out other camera Positons with adequate LookDirections. |
Experiments in MainWindow.xaml.cs: (Restore the original values after any experiment.)
| 1. | Reduce viewport.Width = window.ActualWidth; to window.ActualWidth/2. | Half size |
| 2. | Reduce viewport.Height = window.ActualHeight; to window.ActualHeight/2. | Same size |
| 3. | Drag the window borders at run time and observe the effects of the viewport's changing width and height. | Viewport-width is more important than height. |
Changes in MainWindow.xaml:
Insert 5 additional ImageBrushes into the <Windows.Resources>-tag below the line:
  <ImageBrush x:Key="rightBrush"  ImageSource="http://www.miszalok.de/C_3D_WPF/C3_Dice/Images/right.bmp" />
  <ImageBrush x:Key="backBrush"   ImageSource="http://www.miszalok.de/C_3D_WPF/C3_Dice/Images/back.bmp"  />
  <ImageBrush x:Key="leftBrush"   ImageSource="http://www.miszalok.de/C_3D_WPF/C3_Dice/Images/left.bmp"  />
  <ImageBrush x:Key="topBrush"    ImageSource="http://www.miszalok.de/C_3D_WPF/C3_Dice/Images/top.bmp"   />
  <ImageBrush x:Key="bottomBrush" ImageSource="http://www.miszalok.de/C_3D_WPF/C3_Dice/Images/bottom.bmp"/>
Insert 5 additional DiffuseMaterials into the <Windows.Resources>-tag below the line:
  <DiffuseMaterial x:Key="rightMaterial"  Brush="{StaticResource rightBrush }"/>
  <DiffuseMaterial x:Key="backMaterial"   Brush="{StaticResource backBrush  }"/>
  <DiffuseMaterial x:Key="leftMaterial"   Brush="{StaticResource leftBrush  }"/>
  <DiffuseMaterial x:Key="topMaterial"    Brush="{StaticResource topBrush   }"/>
  <DiffuseMaterial x:Key="bottomMaterial" Brush="{StaticResource bottomBrush}"/>
Insert 5 additional GeometryModel3Ds into the <Model3DGroup x:Name="group">-tag below the line:
      <GeometryModel3D x:Name="right"
          Geometry    ="{StaticResource face_prototype}"
          Material    ="{StaticResource rightMaterial}"
          BackMaterial="{StaticResource rightMaterial}"/>
      <GeometryModel3D x:Name="back"
          Geometry    ="{StaticResource face_prototype}"
          Material    ="{StaticResource backMaterial}"
          BackMaterial="{StaticResource backMaterial}"/>
      <GeometryModel3D x:Name="left"
          Geometry    ="{StaticResource face_prototype}"
          Material    ="{StaticResource leftMaterial}"
          BackMaterial="{StaticResource leftMaterial}"/>
      <GeometryModel3D x:Name="top"
          Geometry    ="{StaticResource face_prototype}"
          Material    ="{StaticResource topMaterial}"
          BackMaterial="{StaticResource topMaterial}"/>
      <GeometryModel3D x:Name="bottom"
          Geometry    ="{StaticResource face_prototype}"
          Material    ="{StaticResource bottomMaterial}"
          BackMaterial="{StaticResource bottomMaterial}"/>
Changes in MainWindow.xaml.cs:
Keep the using lines but replace the complete namespace dice1:
namespace dice1
{ public partial class MainWindow : Window
  { Matrix3D matrix_front  = new Matrix3D(),
             matrix_right  = new Matrix3D(),
             matrix_back   = new Matrix3D(),
             matrix_left   = new Matrix3D(),
             matrix_top    = new Matrix3D(),
             matrix_bottom = new Matrix3D();
    public MaainWindow() //constructor
    { InitializeComponent();
      matrix_front .Rotate( new Quaternion( new Vector3D(0,1,0),   0 ) ); //do nothing
      matrix_right .Rotate( new Quaternion( new Vector3D(0,1,0),  90 ) ); //turn right
      matrix_back  .Rotate( new Quaternion( new Vector3D(0,1,0), 180 ) ); //turn around
      matrix_left  .Rotate( new Quaternion( new Vector3D(0,1,0), -90 ) ); //turn left
      matrix_top   .Rotate( new Quaternion( new Vector3D(1,0,0), -90 ) ); //turn up
      matrix_bottom.Rotate( new Quaternion( new Vector3D(1,0,0),  90 ) ); //turn down
      matrix_front .Translate( new Vector3D( 0.0, 0.0, 0.5 ) ); //shift ahead
      matrix_right .Translate( new Vector3D( 0.5, 0.0, 0.0 ) ); //shift right
      matrix_back  .Translate( new Vector3D( 0.0, 0.0,-0.5 ) ); //shift left
      matrix_left  .Translate( new Vector3D(-0.5, 0.0, 0.0 ) ); //shift back
      matrix_top   .Translate( new Vector3D( 0.0, 0.5, 0.0 ) ); //shift upwards
      matrix_bottom.Translate( new Vector3D( 0.0,-0.5, 0.0 ) ); //shift downwards
      front .Transform = new MatrixTransform3D( matrix_front );
      right .Transform = new MatrixTransform3D( matrix_right );
      back  .Transform = new MatrixTransform3D( matrix_back  );
      left  .Transform = new MatrixTransform3D( matrix_left  );
      top   .Transform = new MatrixTransform3D( matrix_top   );
      bottom.Transform = new MatrixTransform3D( matrix_bottom);
    }
    protected override void OnRenderSizeChanged(SizeChangedInfo sizeInfo)
    { viewport.Width  = window.ActualWidth;
      viewport.Height = window.ActualHeight;
    }
  }
}
Changes in MainWindow.xaml:
Insert a Style-definition in <Window.Resources> below the line
<DiffuseMaterial x:Key="bottomMaterial" Brush="{StaticResource bottomBrush}"/>
  <Style TargetType="{x:Type CheckBox}"><!--Set a property and an event handler for all CheckBoxes-->
   <Setter Property="IsChecked" Value="True"/>
   <EventSetter Event="Click" Handler="on_checkbox_clicked"/>
  </Style>
Insert 6 CheckBoxes just below the <StackPanel Orientation="Vertical">-tag above the line <Viewport3D x:Name="viewport">:
  <StackPanel Orientation="Horizontal" HorizontalAlignment="Center" Margin="0 10 0 10">
   <CheckBox x:Name="cb_front"  Content="front   "/>
   <CheckBox x:Name="cb_right"  Content="right   "/>
   <CheckBox x:Name="cb_back"   Content="back    "/>
   <CheckBox x:Name="cb_left"   Content="left    "/>
   <CheckBox x:Name="cb_top"    Content="top     "/>
   <CheckBox x:Name="cb_bottom" Content="bottom"/>
  </StackPanel><!--end of <StackPanel ... Margin="0 10 0 10">-->
Changes in MainWindow.xaml.cs:
Above last two braces insert the common event handler for all 6 CheckBoxes:
    private void on_checkbox_clicked(object sender, EventArgs e)
    { switch( ((CheckBox)sender).Name )
      { case "cb_front":
             if ( cb_front .IsChecked == false ) group.Children.Remove(    front  );
             else                                group.Children.Insert( 0, front  ); break;
        case "cb_right":
             if ( cb_right .IsChecked == false ) group.Children.Remove(    right  );
             else                                group.Children.Insert( 0, right  ); break;
        case "cb_back":
             if ( cb_back  .IsChecked == false ) group.Children.Remove(    back   );
             else                                group.Children.Insert( 0, back   ); break;
        case "cb_left":
             if ( cb_left  .IsChecked == false ) group.Children.Remove(    left   );
             else                                group.Children.Insert( 0, left   ); break;
        case "cb_top":
             if ( cb_top   .IsChecked == false ) group.Children.Remove(    top    );
             else                                group.Children.Insert( 0, top    ); break;
        case "cb_bottom":
             if ( cb_bottom.IsChecked == false ) group.Children.Remove(    bottom );
             else                                group.Children.Insert( 0, bottom ); break;
      }
      model.Content = group;
    }
Try out the CheckBoxes.
Changes in MainWindow.xaml:
Insert two more Style-definitions in <Window.Resources> below </Style>
  <Style TargetType="{x:Type TextBlock}"><!--Set two properties for all TextBlocks-->
   <Setter Property="FontSize" Value="10"/>
   <Setter Property="HorizontalAlignment" Value="Center"/>
  </Style>
  <Style TargetType="{x:Type Slider}"><!--Set 3 properties and an event handler for all Sliders-->
   <Setter Property="Minimum" Value="-1.5"/>
   <Setter Property="Maximum" Value=" 1.5"/>
   <Setter Property="Value"   Value=" 1.5"/>
   <EventSetter Event="ValueChanged" Handler="on_slider_value_changed"/>
  </Style>
Insert 3 Slider-controls below the line:
</StackPanel><!--end of <StackPanel ... Margin="0 10 0 10">-->.
  <StackPanel Orientation="Vertical" Margin="3">
   <TextBlock Text="Camera moves parallel to the X-axis"/> <Slider x:Name="camera_X_axis_move_slider"/>
   <TextBlock Text="Camera moves parallel to the Y-axis"/> <Slider x:Name="camera_Y_axis_move_slider"/>
   <TextBlock Text="Camera moves parallel to the Z-axis"/> <Slider x:Name="camera_Z_axis_move_slider"/>
  </StackPanel><!--end of <StackPanel Orientation="Vertical" Margin="3">-->
Changes in MainWindow.xaml.cs:
Above the last two braces insert the common event handler for all 3 Sliders:
    private void on_slider_value_changed(object sender, EventArgs e)
    { try
      { double x = camera_X_axis_move_slider.Value;
        double y = camera_Y_axis_move_slider.Value;
        double z = camera_Z_axis_move_slider.Value;
        camera.Position      = new Point3D( x, y, z );
        camera.LookDirection = -(Vector3D)camera.Position; //always look to (0,0,0)
        camera.LookDirection.Normalize(); //vector length = 1
        directionalLight.Direction = camera.LookDirection; //light comes from the camera
      } catch {}
    }
Change the event handler
    protected override void OnRenderSizeChanged(SizeChangedInfo sizeInfo)
    { viewport.Width  = window.ActualWidth;
      viewport.Height = window.ActualHeight - 8*camera_X_axis_move_slider.ActualHeight;
    }
Experiments: (Restore the original values after the experiments.)
| 1. | In MainWindow.xaml change all three Slider-Minima from -1.5 to -3 and Slider-Maxima from 1.5 to 3. |
More freedom to move the camera |
| 2. | Move all Sliders in mid positions ≈ 0. | Inside the dice |
| 3. | Put the x-Slider in mid position ≈ 0. Put the y-Slider in maximum position ≈ 1.5. The camera is now above the top face. Move the z-Slider slowly from left to right. |
Observe how the camera.LookDirection reverses. |
Changes in MainWindow.xaml.cs:
Insert a subroutine call into the constructor public MainWindow() below the line { InitializeComponent();:
corrugate();
Insert the corresponding subroutine above the last two braces of MainWindow.xaml.cs:
    private void corrugate()
    { const int nn = 60; //face width 1.0 will be divided into nn vertical stripes
      Point3D [] p = new Point3D [ 2*nn + 2 ]; //a stripe has 4 vertices
      Point   [] t = new Point   [ 2*nn + 2 ]; //texture coordinates
      int[] index = new int[ 6*nn ]; //2 triangles times 3 vertices per stripe
      double x, dx = 1.0 / nn;       //dx = stripe width
      int i, j;
      double frequency = 8, amplitude = 0.02;
      for ( i=0, x=0; i < p.Length; i+=2, x+=dx ) //compute point and texture coordinates
      { p[i].X =      p[i+1].X = x - 0.5; //face    starts at x=-0.5 and ends at x = 0.5
        t[i].X =      t[i+1].X = x;       //texture starts at x= 0.0 and ends at x = 1.0
        p[i].Y = 0.5; p[i+1].Y = -0.5;    //face    top and bottom
        t[i].Y = 0;   t[i+1].Y = 1;       //texture top and bottom
        p[i].Z =      p[i+1].Z = amplitude * Math.Sin( x*frequency*Math.PI );
      }
      for ( i=0, j=0; i < 6*nn; i+=6, j+=2 ) //2 triangles for each stripe
      { index[i  ] = j;   //1. vertex of 1. triangle
        index[i+1] = j+1; //2. vertex of 1. triangle
        index[i+2] = j+2; //3. vertex of 1. triangle
        index[i+3] = j+1; //1. vertex of 2. triangle
        index[i+4] = j+3; //2. vertex of 2. triangle
        index[i+5] = j+2; //3. vertex of 2. triangle
      }
      MeshGeometry3D face_prototype = (MeshGeometry3D)this.FindResource( "face_prototype" );
      face_prototype.Positions          = new Point3DCollection ( p );
      face_prototype.TextureCoordinates = new PointCollection   ( t );
      face_prototype.TriangleIndices    = new Int32Collection   ( index );
    }
Experiments in MainWindow.xaml.cs: (Restore the original values after the experiments.)
| 1. | Change the no. of stripes const int nn = 60; from 60 to 1, 3, 10 etc. | Flat or askew faces |
| 2. | Change double frequency = 8 to 12, 20 etc. | More waves |
| 3. | Change amplitude = 0.02; to 0, 0.01, 0.03 etc. | Flatter or steeper waves |
| top of page: |