
Course 3D_XNA: 3D-Computer Graphics with XNA
Chapter C6: SkyBox
Copyright © by V. Miszalok, last update: 2010-09-20
Let me know
what you think
| Home | Course Index | << Prev. | C6 Code Comments | PDF Version of this Page |
|
Course 3D_XNA: 3D-Computer Graphics with XNA
|
|
|
Let me know what you think |
|
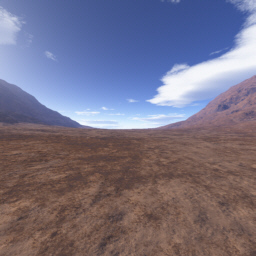
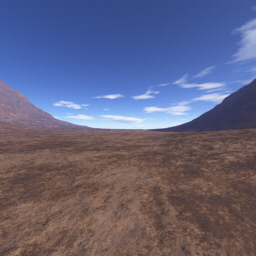
Chapter 6 demonstrates:
- How to program cubic surroundings: landscape and sky.
- How to move a third-person-camera behind the moving space ship.
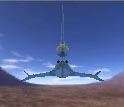
- How to draw a space ship model which has more than one effect.
- How to texture all 6 faces of a cube with one single folding-carton-image.
- How to fold such a texture from six separate images.
Chapter 6 doesn't demonstrate:
- How to avoid collision and breakthrough of the ship through the skybox.
- How to program a first-person-camera fixed inside the cockpit.
- How to program a second-person-camera fixed to the skybox.
- How to change between several cameras.
- How to program circular surroundings: sky domes and sky spheres.
 |
Plug Your XBox 360 Controller into an USB-Port and check it:
Start → Settings → Gamecontroller → |
1. Main Menu after starting VS 2010:
Solution Explorer - skybox1: Delete the file Program.cs and the content of Game1.cs.
2. If You find no Solution Explorer-window, open it via the main menu:
Inside the Solution Explorer-window click + in front of dice1. A tree opens. Look for the branch "References". Click the + in front of References.
Check if there are (among others) these four references:
3.
Right click this link: skybox.x and store it in the project directory C:\temp\skybox1\Content.
Right click this link: ship.fbx and store it in the project directory C:\temp\skybox1\Content.
Right click this link: skybox_texture.jpg and store it in the project directory C:\temp\skybox1\Content.
Right click this link: ship_texture.tga and store it in the project directory C:\temp\skybox1\Content.
4. Now You have to add these six images and the Mesh file to project skybox1:
Right click the branch skybox1 → Content → Add →
Select the 4 imported files, quit by clicking the Add-button and check whether they arrived underneath the branch skybox1 → Content.
5. The 2 textures are automatically compiled. For this reason they should not compile on their own. Change their default Build Action-properties "Compile" to "None".
Write the following code into the empty code window of Game1.cs:
using System;
using Microsoft.Xna.Framework;
using Microsoft.Xna.Framework.Content;
using Microsoft.Xna.Framework.Graphics;
using Microsoft.Xna.Framework.Input;

static class Program
{ [STAThread] static void Main() { Game1 game = new Game1(); game.Run(); }

public class Game1 : Game
{ private GraphicsDeviceManager g;
  private ContentManager content;
  private Model skyModel, shipModel;
  private BasicEffect skyEffect;
  //private Matrix world, view, proj;
  private Matrix viewM, projM, skyworldM, shipworldM;
  private static float skyscale  = 10000f;
  private float slow = skyscale / 200f;  // step width of movements
  private float rotationX, rotationY, rotationZ;
  private Vector3 shipPos   = Vector3.Zero,
                  cameraPos = new Vector3( 0f, 500f,  3000f ),
                  camLookAt = new Vector3( 0f, 500f, -3000f );

  public Game1()
  { g = new GraphicsDeviceManager( this );
    content  = new ContentManager( Services );
  }
  protected override void Initialize()
  { g.IsFullScreen = false;
    Window.Title = "SkyBox";
    Window.AllowUserResizing = true;
    base.Initialize();
  }
  protected override void LoadContent()
  { skyModel   = content.Load< Model >( "Content\\skybox"  );
    shipModel  = content.Load< Model >( "Content\\ship"  );
    //skyModel just has 1 effect whereas shipModel has 3 effects.
    skyEffect  = (BasicEffect)skyModel .Meshes[0].Effects[0];
  }
  protected override void UnloadContent()
  { content.Unload();
  }
  protected override void Update( GameTime gameTime )
  { GamePadState s = GamePad.GetState( PlayerIndex.One );
    if ( !s.IsConnected ) Exit();
    ButtonState bp = ButtonState.Pressed;
    if ( s.Buttons.Back  == bp )
    { shipPos = Vector3.Zero;
      cameraPos = new Vector3( 0f, 500f,  3000f );
      camLookAt = new Vector3( 0f, 500f, -3000f );
      rotationX = rotationY = rotationZ = 0f;
    }
    if ( s.DPad.Left ==bp ) { cameraPos.X-=slow; camLookAt.X-=slow; shipPos.X-=slow; }
    if ( s.DPad.Right==bp ) { cameraPos.X+=slow; camLookAt.X+=slow; shipPos.X+=slow; }
    if ( s.DPad.Up   ==bp ) { cameraPos.Y+=slow; camLookAt.Y+=slow; shipPos.Y+=slow; }
    if ( s.DPad.Down ==bp ) { cameraPos.Y-=slow; camLookAt.Y-=slow; shipPos.Y-=slow; }

    Vector2 ts = s.ThumbSticks.Left;  rotationZ-=0.1f*ts.X; rotationX-=0.1f*ts.Y;
            ts = s.ThumbSticks.Right; rotationZ-=0.1f*ts.X; rotationY-=0.1f*ts.Y;
    shipworldM = Matrix.CreateTranslation( shipPos );
    skyworldM  = Matrix.CreateScale( skyscale , skyscale , skyscale  );
    viewM      = Matrix.CreateTranslation( -shipPos.X, -shipPos.Y, -shipPos.Z ) *
                 Matrix.CreateRotationX( rotationX ) *
                 Matrix.CreateRotationY( rotationY ) *
                 Matrix.CreateRotationZ( rotationZ ) *
                 Matrix.CreateLookAt( cameraPos, camLookAt, Vector3.Up ) * shipworldM;
    projM = Matrix.CreatePerspectiveFieldOfView( MathHelper.Pi/3, 1f, 1f, 10f*skyscale );
    g.GraphicsDevice.RenderState.CullMode = CullMode.None;
    //g.GraphicsDevice.RenderState.DepthBufferEnable = false;
    //g.GraphicsDevice.RenderState.FillMode = FillMode.WireFrame;
    base.Update( gameTime );
  }
  protected override void Draw( GameTime gameTime )
  { g.GraphicsDevice.Clear( Color.DarkBlue );
    skyEffect.World      = skyworldM;
    skyEffect.View       = viewM;
    skyEffect.Projection = projM;
    skyModel .Meshes[0].Draw();
    foreach ( BasicEffect effect in shipModel.Meshes[0].Effects )
    { effect.EnableDefaultLighting();
      effect.World      = shipworldM;
      effect.View       = viewM;
      effect.Projection = projM;
      shipModel.Meshes[0].Draw();
    }
  }
} // end of class Game1
} // end of class Program
Debug → Start Without Debugging.
Try out both ThumbSticks, the DPad and the buttons Y, A, X, B and Back.
It's surprisingly complicated to write an x-File for a textured box.
The main problems are:
1) A textured box needs 24 vertices.
2) The arrangement of the vertices inside the VertexBuffer and the IndexBuffer determine the orientation of any single face. It's tricky to fit the borders of the 6 faces in a consistent order.
3) The MeshTextureCoords-List must carefully match the order of the VertexBuffer and the IndexBuffer.
4) The MeshNormals-List must contain oblique vectors normalized to length 1.0.
5) Widths and heights of the textured images must be powers of 2: 32,64,128,256 etc.
6) Only *.bmp and *.jpg image file formats are allowed.
This is the listing of skybox.x :
xof 0302txt 0064
Mesh skybox {
//VertexBuffer
//A box has 24 textured vertices.
//We order the vertices by faces and surround any face clockwise starting at its left upper corner.
//Center of the coordinate system = center of the box = Vector3.Zero.
//Left-handed coordinate system = Y-axis upwards = Vector3.Up.
24;
-1.0;  1.0; -1.0;, //front  left  up
 1.0;  1.0; -1.0;, //       right up
 1.0; -1.0; -1.0;, //       right down
-1.0; -1.0; -1.0;, //       left  down
 1.0;  1.0;  1.0;, //back   right down
-1.0;  1.0;  1.0;, //       left  down
-1.0; -1.0;  1.0;, //       left  up
 1.0; -1.0;  1.0;, //       right up
-1.0;  1.0;  1.0;, //top    left  up
 1.0;  1.0;  1.0;, //       right up
 1.0;  1.0; -1.0;, //       right down
-1.0;  1.0; -1.0;, //       left  down
-1.0; -1.0; -1.0;, //bottom left  up
 1.0; -1.0; -1.0;, //       right up
 1.0; -1.0;  1.0;, //       right down
-1.0; -1.0;  1.0;, //       left  down
 1.0;  1.0; -1.0;, //right  left  up
 1.0;  1.0;  1.0;, //       right up
 1.0; -1.0;  1.0;, //       right down
 1.0; -1.0; -1.0;, //       left  down
-1.0;  1.0;  1.0;, //left   left  up
-1.0;  1.0; -1.0;, //       right up
-1.0; -1.0; -1.0;, //       right down
-1.0; -1.0;  1.0;; //       left  down
//IndexBuffer
6;                 // 6 faces
4; 0, 1, 2, 3;,
4; 4, 5, 6, 7;,
4; 8, 9,10,11;,
4;12,13,14,15;,
4;16,17,18,19;,
4;20,21,22,23;;

MeshMaterialList { //just one 1024x1024 folding-carton-texture
1; 1; 0;;
Material {
1.0; 1.0; 1.0; 1.0;; // R = 1.0, G = 1.0, B = 1.0
0.0;
0.0; 0.0; 0.0;;
0.0; 0.0; 0.0;;
TextureFilename { "skybox_texture.jpg"; }
} //end of Material
} //end of MaterialList

MeshTextureCoords {
24; //All coordinates are shifted by +/- 0.001
    //otherwise rounding errors cause white edges
0.251; 0.501;  //front  left  up
0.499; 0.501;  //       right up
0.499; 0.749;  //       right down
0.251; 0.749;  //       left  down
0.499; 0.249;  //back   right down
0.251; 0.249;  //       left  down
0.251; 0.001;  //       left  up
0.499; 0.001;  //       right up
0.251; 0.251;  //top    left  up
0.499; 0.251;  //       right up
0.499; 0.499;  //       right down
0.251; 0.499;  //       left  down
0.251; 0.751;  //bottom left  up
0.499; 0.751;  //       right up
0.499; 0.998;  //       right down
0.251; 0.998;  //       left  down
0.501; 0.501;  //right  left  up
0.749; 0.501;  //       right up
0.749; 0.749;  //       right down
0.501; 0.749;  //       left  down
0.001; 0.501;  //left   left  up
0.249; 0.501;  //       right up
0.249; 0.749;  //       right down
0.001; 0.749;; //       left  down
}
} //end of Mesh skybox {
Beside our self-made skybox.x we use a prefabricated mesh ship.fbx,
which is almost identical to p1_wedge.fbx from the Microsoft XNA Tutorial1:
Therefore our image ship_texture.tga is a copy from wedge_p1_diff_v1.tga.
Opening ship.fbx with a text editor reveals a complicated text file of 15,000 lines.
It has been probably designed and exported using Autodesk Maya.
FBX is a (often changing) proprietary format of Autodesk that provides access to 3D, 2D, audio and video content.
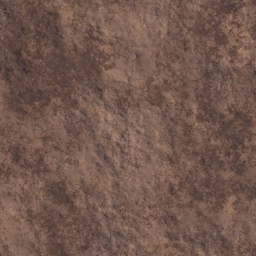
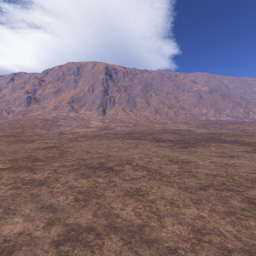
A SkyBox consists of 6 single 256x256 pictures that are connected to one 1024x1024 skybox_texture.jpg.
Connecting all textures of a mesh into one single texture image is a common way to simplify texture handling.
Advantage 1: It is easier to distribute one single image per mesh. See also: Images/ship_texture.tga.
Advantage 2: The mesh-file skybox.x needs only one Material (otherwise it has to contain 6 of them. See ../C5_Dice/XNAC5_e.htm#a4.
Advantage 3: The Draw-function of skybox1 does'nt have to loop through all effects since there is just one: model.Meshes[0].Effects[0].
Disadvantage: The texture coordinates of skybox.x don't fit exactly to skybox_texture.jpg resulting in thin white lines at some folding edges. The best way to avoid such inaccuracies is to return to 6 independent images as in ../C5_Dice/CXNAC5_e.htm.
| front.jpg | back.jpg | top.jpg | bottom.jpg | right.jpg | left.jpg | → | skybox_texture.jpg |
 |
 |
 |
 |
 |
 |
 |
It's tedious to shift the pictures manually to skybox_texture.jpg.
using System;
using System.Drawing;
using System.Drawing.Imaging;
using System.Windows.Forms;

public class Form1 : Form
{ [STAThread] static void Main() {  Application.Run( new Form1() ); }
  Bitmap Front, Bottom, Left, Right, Top, Back, All;
  String s = "C:\\temp\\skybox1\\Images\\"; //adjust to wherever they are
  public Form1()
  { Width  = 1024; Height = 1024;
    Front  = (Bitmap)Image.FromFile( s + "front.jpg"  );
    Bottom = (Bitmap)Image.FromFile( s + "bottom.jpg" );
    Top    = (Bitmap)Image.FromFile( s + "top.jpg"    );
    Right  = (Bitmap)Image.FromFile( s + "right.jpg"  );
    Left   = (Bitmap)Image.FromFile( s + "left.jpg"   );
    Back   = (Bitmap)Image.FromFile( s + "back.jpg"   );
    All    = new Bitmap( 1024, 1024, PixelFormat.Format32bppRgb );
  }
  protected override void OnPaint( PaintEventArgs e )
  { Graphics g = Graphics.FromImage( All );
    g.FillRectangle( new SolidBrush( Color.White ), 0, 0, 1024,1024 );
    g.DrawImage( Front  , 256, 512, 256, 256 );
    g.DrawImage( Bottom , 256,1023, 256,-256 );
    g.DrawImage( Top    , 256, 256, 256, 256 );
    g.DrawImage( Right  , 512, 512, 256, 256 );
    g.DrawImage( Left   ,   0, 512, 256, 256 );
    g.DrawImage( Back   , 512, 256,-256,-256 );
    All.Save( s + "skybox_texture.jpg", ImageFormat.Jpeg );
    e.Graphics.DrawImage( All,0, 0 );
  }
}
1. Press the DPad (DPad = round button carrying a cross) to the right until the ship leaves the right wall of the skybox.
Repeat that with the other directions left, up and down in order to realize that the ship is inside a box.
2. Shrink the box to 10% by reducing the global variable static float skyscale = 10000f; from 10,000 to 1,000.
3. Rotate the observer with both thumb sticks. Reset ship, box and observer to their initial positions by pressing the small BACK-button.
4. Elevate the observer by doubling the y-coordinates of both global variables cameraPos and camLookAt from 500f to 1000f. Do not forget to make the same changes in the
5. Set the observer inside the ship by changing
6. Remove the comment sign // from the line //g.GraphicsDevice.RenderState.DepthBufferEnable = false;.
7. Remove the comment sign // from the line //g.GraphicsDevice.RenderState.FillMode = FillMode.WireFrame;.
8. Comment out the line "device.RenderState.CullMode = CullMode.None;" inside the
9. Comment out the line "effect.EnableDefaultLighting();" inside the
10. Try to prevent the ship from leaving the skybox (collision detection).
| top of page: |